Accessibility for UIKit

접근성 관련해서 잘 지원해주는 플랫폼 중 하나는 애플이다. 아래는 애플의 접근성 관련 설명 페이지

https://developer.apple.com/documentation/uikit/accessibility_for_uikit


Supporting VoiceOver in Your App

여러 접근성 중 보이스오버가 가장 많이 적용하는 것 중 하나일 것이다. 아래 페이지는 애플 가이드 페이지

https://developer.apple.com/documentation/uikit/accessibility_for_ios_and_tvos/supporting_voiceover_in_your_app

  • The accessibilityLabel property provides descriptive text that VoiceOver reads when the user selects an element.
  • The accessibilityHint property provides additional context (or actions) for the selected element.


Accessibility for iOS Developer Guide 

iOS 접근성 관련해서 정말 잘 설명되어있는 가이드 페이지! 

https://a11y-guidelines.orange.com/en/mobile/ios/development/


iOS developer guide - Orange digital accessibility guidelines

VoiceOver must vocalize every informative element with a high degree of quality in order to let the user know and perfectly understand the context of the consulted page. The accuracy of this vocalization is done through four attributes: label, hint, value

a11y-guidelines.orange.com


Raywenderlich의 Accessibility 가이드 페이지

https://www.raywenderlich.com/6827616-ios-accessibility-getting-started


iOS Accessibility: Getting Started

In this iOS accessibility tutorial, learn how to make apps more accessible using VoiceOver and the Accessibility inspector.

www.raywenderlich.com

https://www.raywenderlich.com/4720178-ios-accessibility-tutorial-making-custom-controls-accessible


iOS Accessibility Tutorial: Making Custom Controls Accessible

In this iOS accessibility tutorial, you’ll learn to make custom controls accessible using VoiceOver, elements group, custom action, traits, frame and more.

www.raywenderlich.com


시뮬레이터에서 접근성 테스트 방법

XCode > Open Developer Tool > Accessibility Insepector


연차가 쌓일수록 나에게 멘토가 필요했다.
그 멘토를 찾는 과정에서 발견한 이 책. 

이 책의 부제는 '숙련공에서 마스터로' 이다.
숙련공이 마스터가 되는 것은 단순한 기계적 학습이 아닌, 지혜가 필요하다.
마스터로부터 그런 통찰과 직관, 지혜를 배울 수 있는 책.

이 책을 정독하고, 블로그에 내용을 정리할 예정이다.


실용주의란?

어떤 특정 기술에 매이면 안 되며, 개별 상황마다 그 상황에서 좋은 해결방안을 고를 수 있도록 충분한 배경지식과 경험을 가지는 것.
배경지식은 컴퓨터 과학의 기본 원리들을 이해하는 것이서 나오고, 경험은 다양한 범위의 실제 프로젝트들을 수행해보는 것에서 나온다.
이론과 실천의 결합은 우리를 강하게 만든다.

무엇이 실용주의 프로그래머를 만드는가?

  • 얼리어덥터 성향 / 새로운 것에 빨리 적응하는 성향
  • 캐묻기 좋아한다.
  • 비판적인 사고의 소유자
  • 현실적이다.
  • 다방면의 기술에 익숙하다.

실용주의 프로그래머 Tip

이 책은 실용주의 프로그래머가 되기 위한 많은 팁을 제공한다. 그중에 이 장에서는 두가지 ...

  1. 자신의 기술(craft)에 관심과 애정을 가져라.
  2. 자신의 일에 대해 생각하면서 일하라!
    - 모든 개발 과정에서, 매일, 우리가 내리는 모든 결정을 지속적이고 비판적으로 평가해보는 것.
    - 절대 기계적으로 일하지 말라. 언제나 생각하고, 언제나 일하면서, 동시에 자신의 일을 비평하고 분석하라.
    - 오래된 IBM의 표어인 생각하라!(THINK!) 가 실용주의 프로그래머의 주문(mantra)이다.

이것은 끊임없이 지속되는 과정

매일 같이 지금 있는 기술들을 더 다듬고, 우리 기술 목록에 새로운 도구들을 추가하라. 
몇 년이 지나면 얼마나 우리의 경험이 무르익고 기술이 자랐는지 우리 스스로 놀랄 것이다.


Reference.
The Pragmatic Programmer: From Journeyman to Master by Andrew Hunt, David Thomas 


목차

  • UNUserNotificationCenter란?
  • Push Notification 사용 권한 요청
    1. UNUserNotificationCenterDelegate 채택
    2. Notification 권한 부여 요청
    3. APNS(Apple Push Notification Service)에 등록


UNUserNotificationCenter란?

앱과 앱 익스텐션에 대한 알림 관련 작업을 관리하기 위한 센트럴 오브젝트.
공유된 UNUserNotificationCenter 객체를 사용하여 앱과 앱 확장의 모든 알림 관련 동작을 관리한다.


Push Notification 사용 권한 요청 

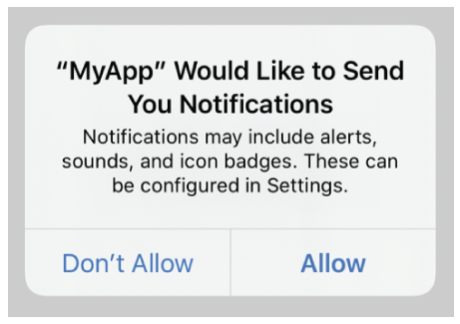
알림에 응답하여 알럿을 표시하거나, 소리를 재생하거나, 앱 아이콘에 배지를 달 수 있는 권한을 요청하는 방법에 대해 알아보자.


1. UNUserNotificationCenterDelegate 채택

알림 관련 작업을 처리하려면 UNUserNotificationCenterDelegate 프로토콜을 채택하는 객체를 생성하여 이 객체의 델리게이트 프로퍼티에 할당한다. 이 작업은 해당 델리게이트와 상호작용을 할 수 있는 다른 작업을 수행 하기 전에 이 델리게이트 프로퍼티에 객체를 항상 할당하자.

class AppDelegate: UIResponder, UIApplicationDelegate, UNUserNotificationCenterDelegate {
    func application(_ application: UIApplication, didFinishLaunchingWithOptions launchOptions: [UIApplication.LaunchOptionsKey: Any]?) -> Bool {
        UNUserNotificationCenter.current().delegate = self
        return true
    }
}


2. Notification 권한 부여 요청

승인을 요청하려면, UNUserNotificationCenter 인스턴스를 가져와서 requestAuthorization(options:completionHandler:) 을 호출하자. (alert, sound, badge 타입 요청 가능)

let center = UNUserNotificationCenter.current()
center.requestAuthorization(options: [.alert, .sound, .badge]) { granted, error in
    
    if let error = error {
        // Handle the error here.
    }
    
    // Enable or disable features based on the authorization.
}


3. APNS(Apple Push Notification Service)에 원격 알림을 수신하도록 등록

Apple Push Notification Service에 등록 프로세스를 시작하려면 아래 메소드를 호출하자. (Main Thread에서 진행해야함.)

DispatchQueue.main.async {
    UIApplication.shared.registerForRemoteNotifications()
}

등록이 성공되었다면, 앱은 앱 델리게이트 객체의 application(_:didRegisterForRemoteNotificationsWithDeviceToken:) 메소드를 호출하여 디바이스 토큰을 전달함. (디바이스의 원격 알림을 생성하기 위해서는 서버에 이 토큰을 전달해야함.)

func application(_ application: UIApplication, didRegisterForRemoteNotificationsWithDeviceToken deviceToken: Data) {
}

등록이 실패되었다면, 앱은 앱 델리게이트 객체의 application(_:didFailToRegisterForRemoteNotificationsWithError:) 메소드를 호출한다.

func application(_ application: UIApplication, didFailToRegisterForRemoteNotificationsWithError error: Error) {
}


Ref.

C언어 기반의 프로그래밍 언어에서는 main이라는 함수가 앱의 시작이 된다.
iOS 앱 또한 Objective-C 기반에서 돌아가기 때문에 앱은 main 함수에서 시작된다.


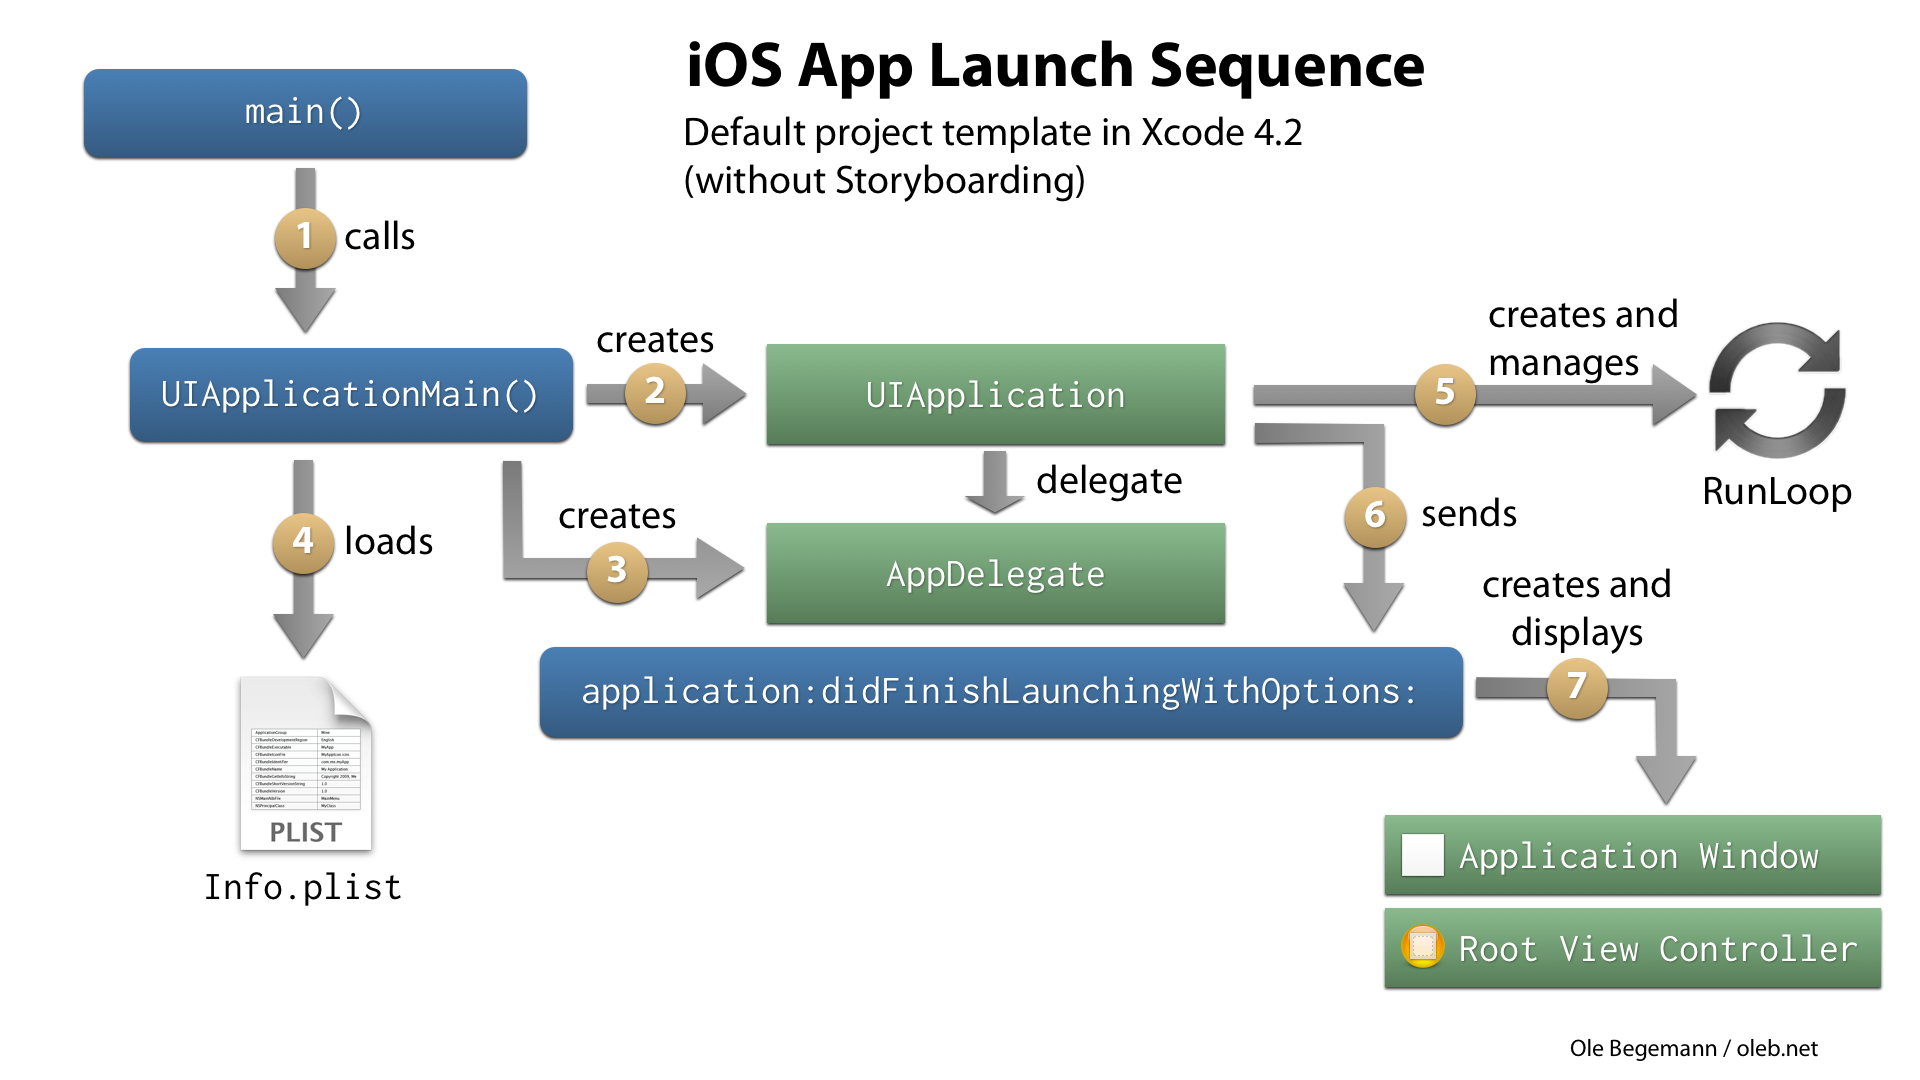
iOS 애플리케이션 실행 순서

  1. main 함수 실행
  2. main 함수에서 UIApplicationMain 함수 실행 (앱의 본체에 해당하는 객체인 UIApplication 객체 생성)
  3. Info.plist 파일을 읽어들여 파일에 기록된 정보를 참고하여 그 외에 필요한 데이터 로드.
    (Main nib 파일을 사용하는 경우 이 과정에서 로드됨.)
  4. Main nib 파일이 없거나 그 속에서 앱 델리게이트가 없는 경우, 앱 델리게이트 객체를 만들고 앱 객체와 연결.
  5. 런루프를 만드는 등 실행에 필요한 준비를 마무리함.
  6. 실행 완료를 앞두고, 앱 객체가 앱 델리게이트에게 application:didFinishLaunchingWithOptions: 메시지를 보냄.

Objective-C 기반 iOS 프로젝트 main.m 파일


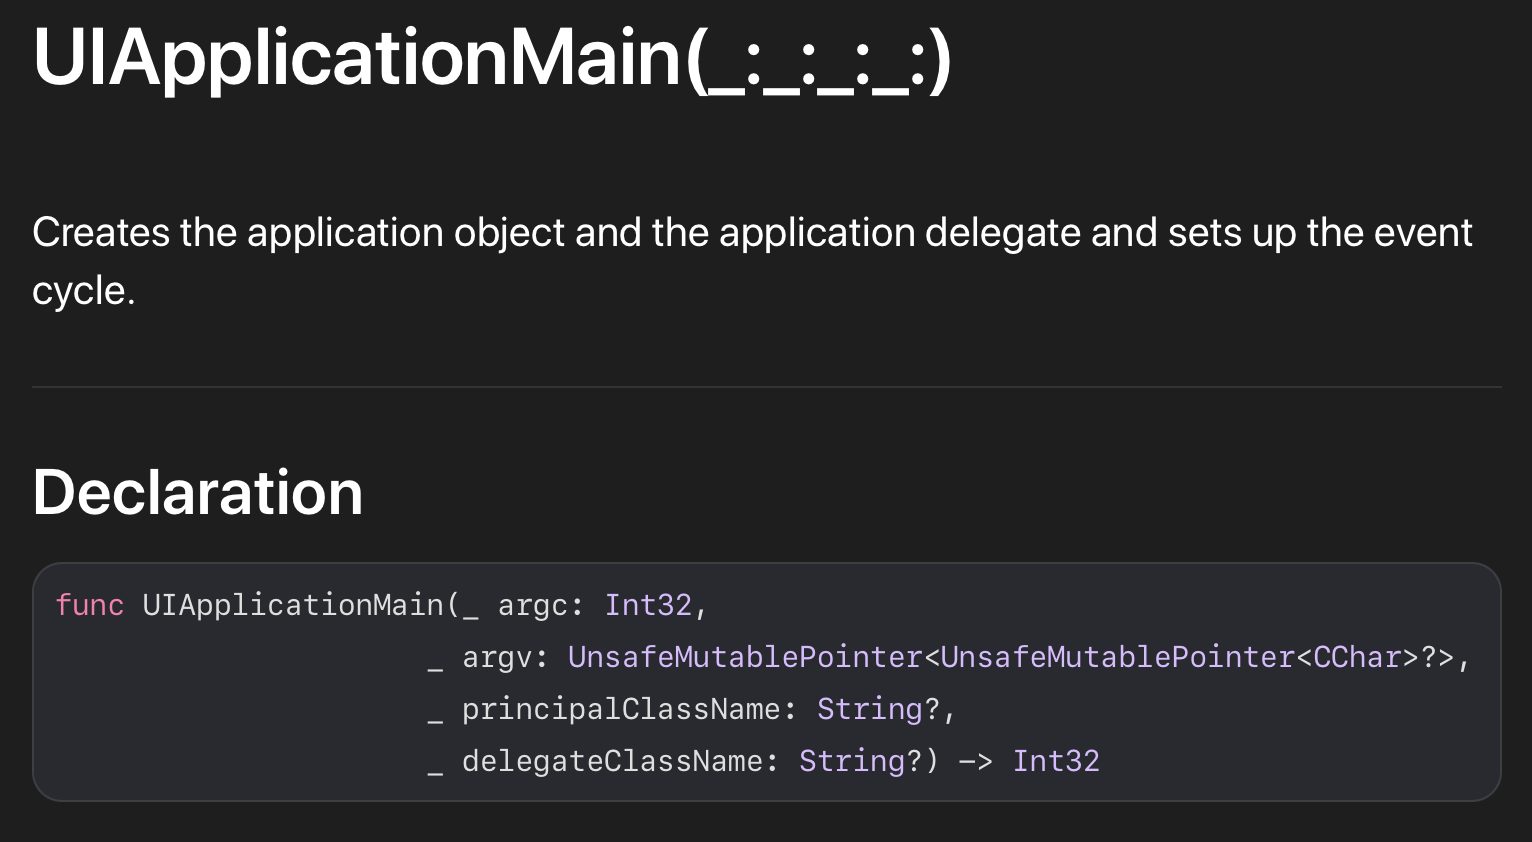
UIApplicationMain 함수: 앱 로딩 프로세스

파라미터

  • principalClassName: 앱 객체가 될 클래스 이름. nil이면 UIApplication으로 대체
  • appDelegateClassName: 앱 델리게이트 클래스 이름.

기능

  • 앱의 본체에 해당하는 객체인 UIApplication 객체 생성, 이 객체는 앱의 Life Cycle 관리
  • 지정된 클래스(@UIApplicationMain이 표시된)에서 델리게이트를 인스턴스화 하고 이를 앱의 객체에 할당
  • 앱의 Run Loop를 포함한 기본 이벤트처리 루프를 설정하고 이벤트 처리 시작
  • 앱의 info.plist에 불러올 main nib 파일이 명시되어있으면, 해당 nib 파일을 불러옴.


이제 @main에 대해 알아보자.

 Swift 기반으로된 iOS 프로젝트는 main 파일이 없다. 그이유는?
@main을 선언하여 iOS 앱의 진입점을 컴파일러가 합성하기 때문.

@main을 선언해줌으로써, UIKit 앱의 진입점은 해당 클래스이고, 시스템은 UIApplicationDelegate 프로토콜에 구현되어있는 정적 main() 함수를 호출함.


(추가) Swift 5.3부터 프로그램의 entry point를 알려주는 속성이 @UIApplicationMain에서 @main으로 변경됨.


Ref.

아래 내용은 let us: Go! 2017 'Functional Reactive Programming 패러다임' 발표 내용을 정리한 글입니다.


Contents

  1. Programming
  2. Paradigm (패러다임)
  3. Functional
    1) Immutable
    2) Pure function (순수 함수)
    3) Generator, Function, Consumer, Composition
    4) High-Order function, First Class Citizen
    5) Imperative Programming(명령형 프로그래밍) vs Declarative Programming(선언형 프로그래밍)
  4. Reactive

Summary

  • Functional: (Concurrent 시대에 여러 프로그램이 동시에 돌아가기 위해서 외부에 영향을 주지 않아야 하기 때문에 )
    Side-Effect가 없도록 프로그래밍 하는 패러다임
  • Reative:
    Async한 작업을 Functional하게 처리하는 아이디어
  • RxSwift:
    Reactive 아이디어를 구현한 Swift 라이브러리


1. Programming

Input으로 Output을 만드는 것, Output을 만드는 과정을 프로그래밍


2. Paradigm(패러다임)

정의
어떤 한 시대 사람들이 견해나 사고를 근본적으로 규정하고 있는 테두리로서의 인식의 체계, 또는 사물에 대한 이론적인 틀이나 체계를 의미하는 개념 (by 위키백과)


(동시대를 살아가고 있는 사람들이 같은 생각을 가지고 있는 것 - 그 시대를 반영함)


시대 Low Memory Mass Production Concurrency
특징 Low Memory
Optimized
Data : Program = 1 : 1
Medium Memory
Resuable
Abstract Data
High Memory
Performance / Responsibility
Concurrency
설명 - 최적화가 목표 - 프로그래밍 대량 생산해야 하는 시대
- 데이터 처리 재사용성을 높이는 방법과 클래스화, 추상화를 하여 재사용성을 높이는 새로운 패러다임이 생김
- 동시에 여러개인 프로그램이 실행되야 하는 시대 
: 프로그램이 동시에 여러 인스턴스로 실행됨
- 프로그램이 다른 프로그램의 영향을 주면 안됨
: Performance, 신뢰성 중요


3. Functional

Immutable, Pure function, Composition, High-Order function, first class citizen 등 이와 같은 용어가 왜 생겨나게 되었는지 살펴보자.

1) Immutable

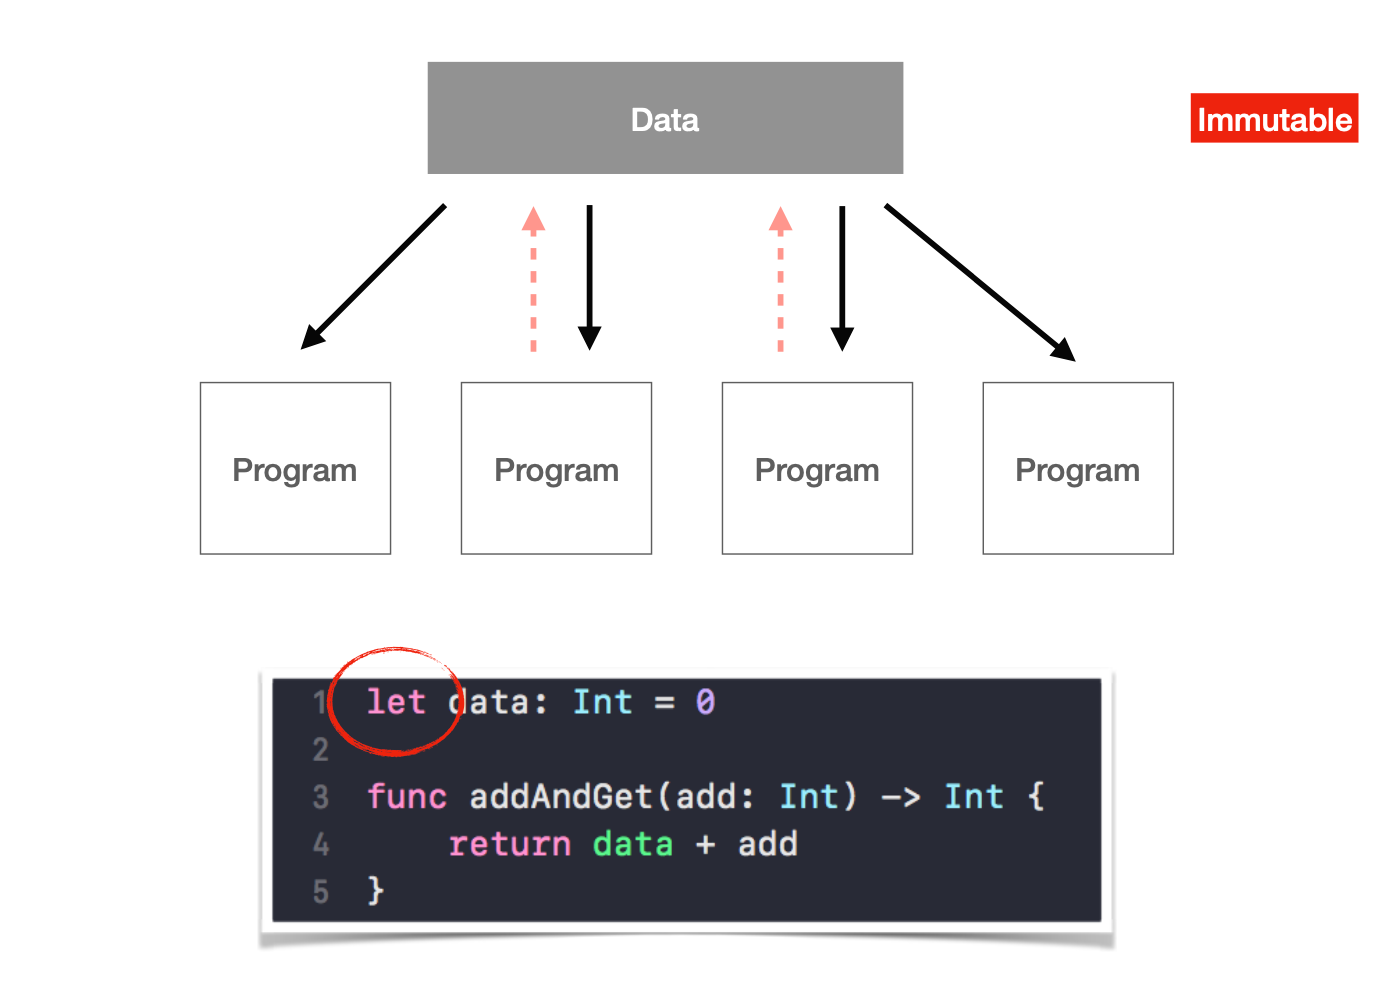
  • 데이터 공유에 대한 문제점을 해결하고자 값을 쓰지 못하게 하는 Immutable 용어 등장
  • Concurrency 시대에서 데이터를 여러 프로그램(인스턴스)이 동시에 읽고 쓰는 문제가 생김. (Read는 문제가 없지만 Write에 문제가 있음)
    • 전 시대에는 synchronize를 걸고, 세마포어나 뮤텍스를 사용하여 동기화를 맞추는 방법으로 해결함
    • 요즘 modern language들은 못쓰는 변수 제공 : "Immutable" (ex. Swift Langauge의 let)

2) Pure function (순수 함수)

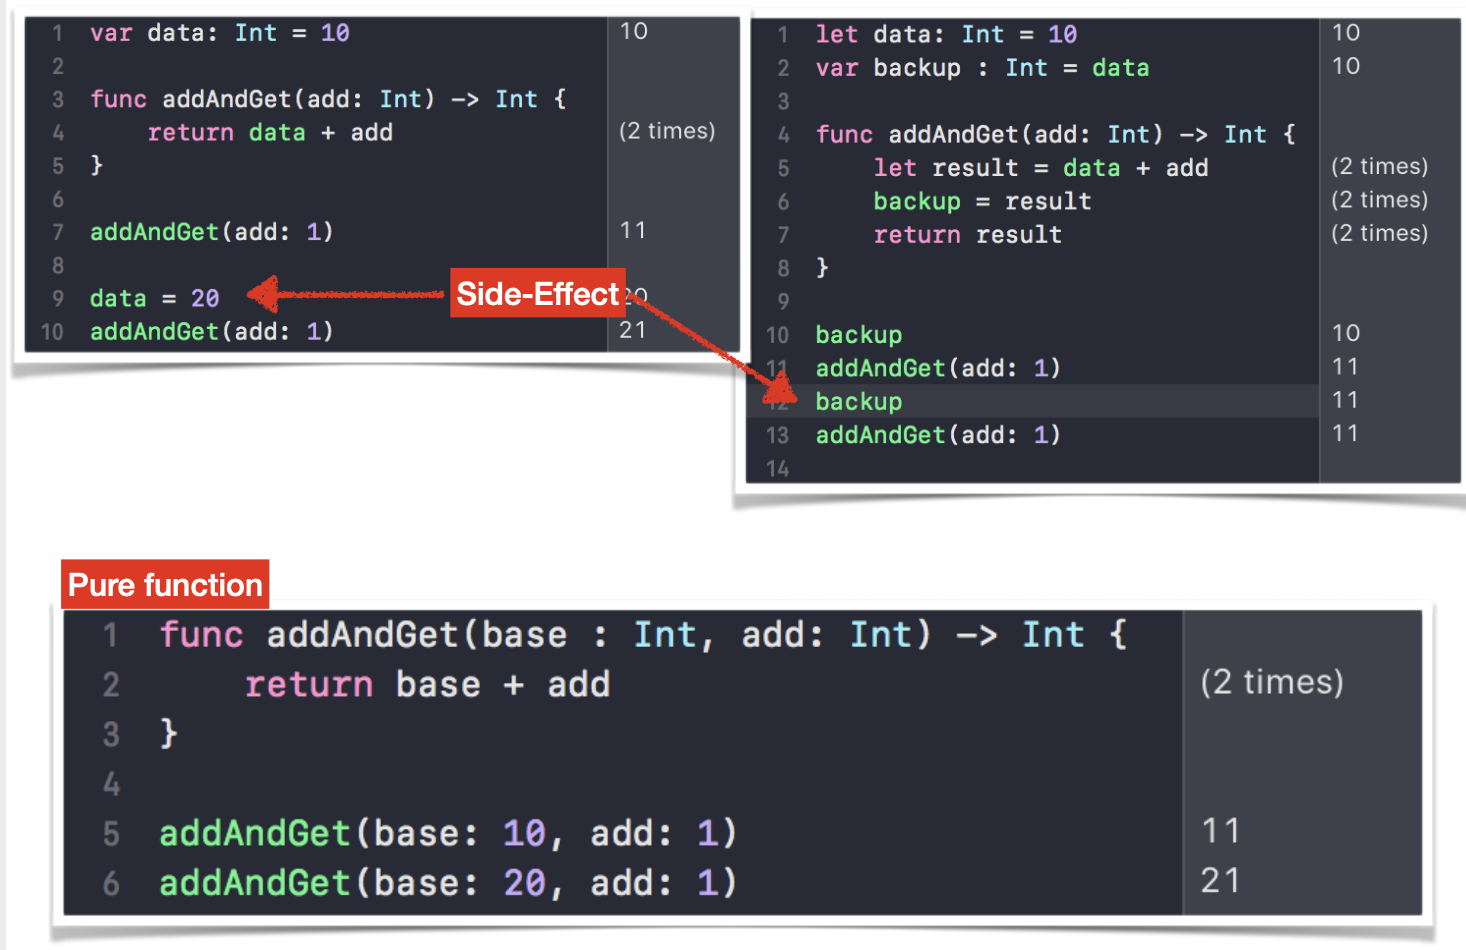
  • Pure function(순수 함수): 외부 변수를 사용하지 않고 파라미터로 값을 만들고 새로운 값을 리턴하는 함수
  • 배경: Concurrency 시대에 값을 공유함으로써 Side-Effect가 생김 (외부 변수에 문제가 생기기 때문에 Side-Effect라고 부름)
  • 결론: 순수함수를 사용하자. (high memory 시대니까 메모리는 걱정 없으니까 side-effect를 줄이기 위해서)


3) Generator, Function, Consumer, Composition

  • 함수 종류의 용어 정리
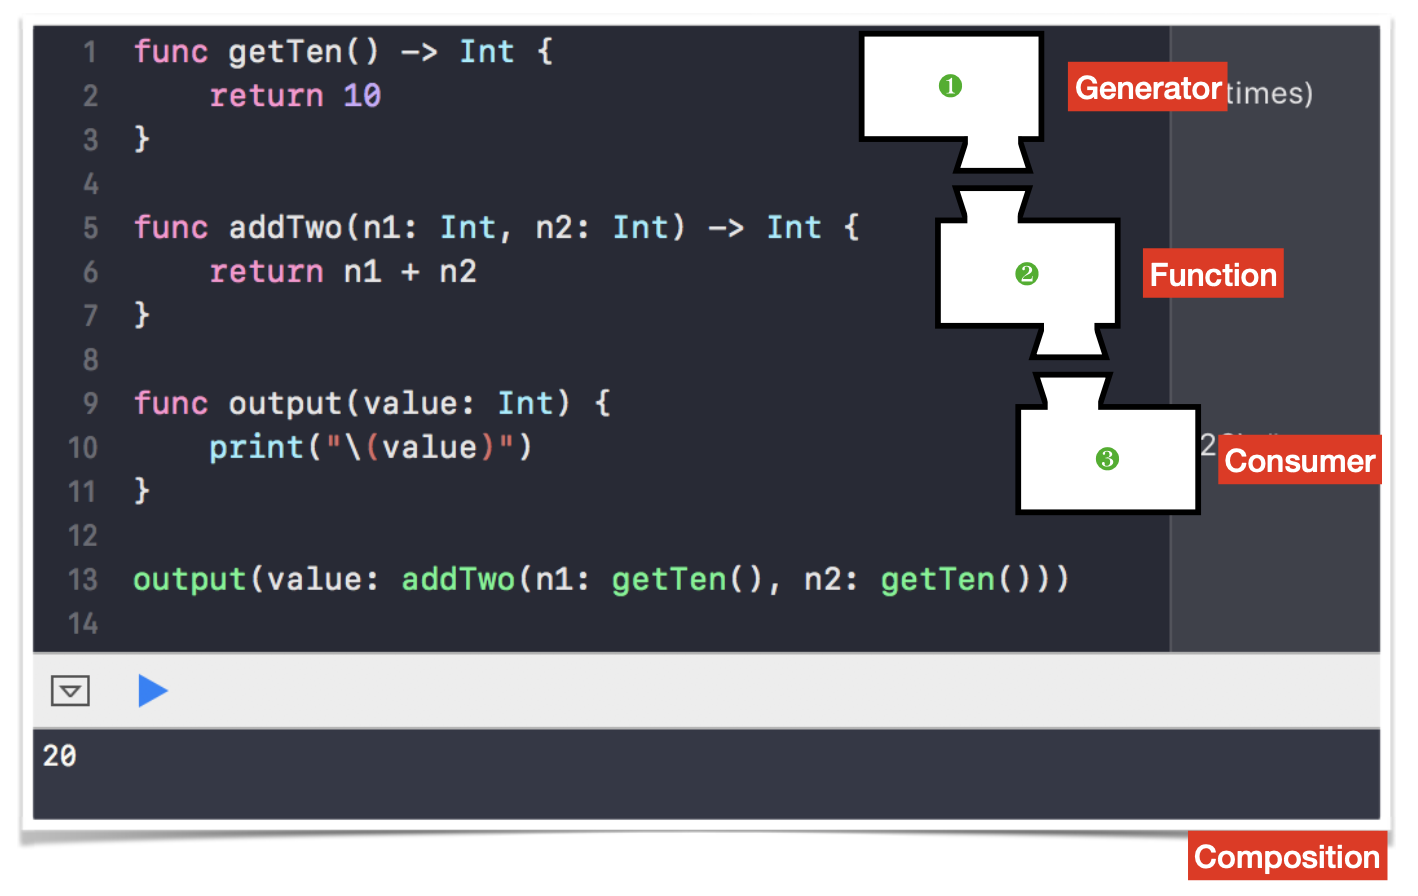
    • Generator: Output만 존재하는 함수
    • Function: Input, Output이 존재하는 함수
    • Consumer: Input만 존재하는 함수
    • (Ref. Submodule, Action: Input, Output이 없는 함수)
  • Composition (함수의 합성) : 함수와 함수를 섞어서 사용하는 것을 뜻함.

4) High-Order function, First Class Citizen

  • High-Order function (고차 함수):
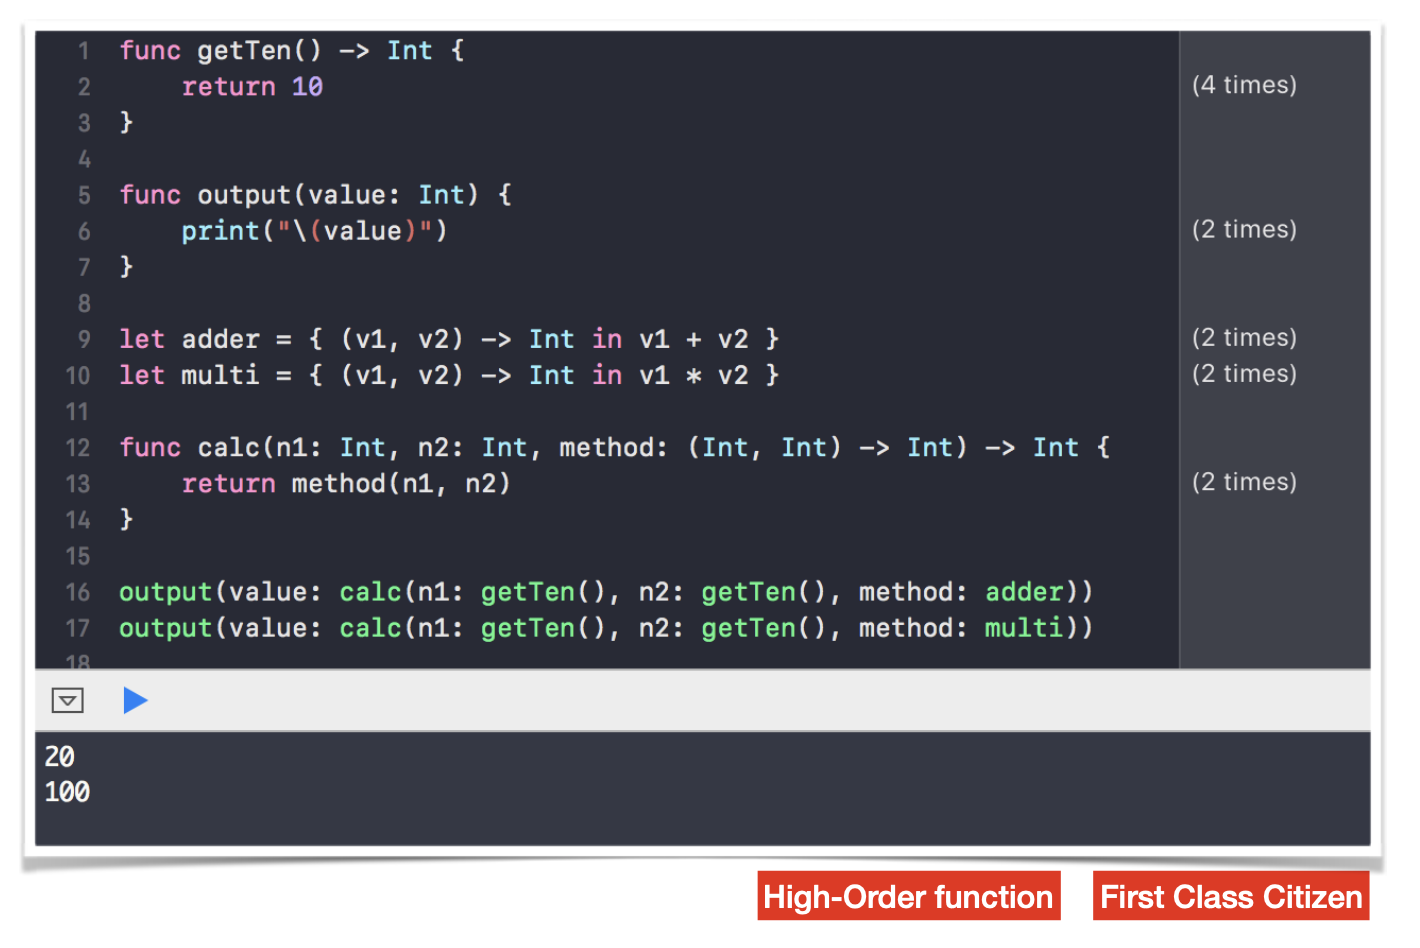
    함수가 파라미터로 전달되는 될 때, 함수 안에서 함수가 사용되는 것이 2개면 2차 함수, 3개면 3차함수, 여러개면 고차함수.
  • First Class Citizen (일급 개체):
    변수에 담거나 리턴값으로 사용할 수 있거나, Array에 담을 수 있는 것을 일급 개체라고 함.
  • Funtional Language: Function 자체를 일급 개체화 할 수 있는 언어
  • Swift는 Multi-Paradigm Language : Function, Protocol, Struct를 일급개체화 할 수 있으므로.
    (Ref. 자바는 Object를 일급개체화 하므로 OOP)


5) Imperative Programming(명령형 프로그래밍) vs Declarative Programming(선언형 프로그래밍)


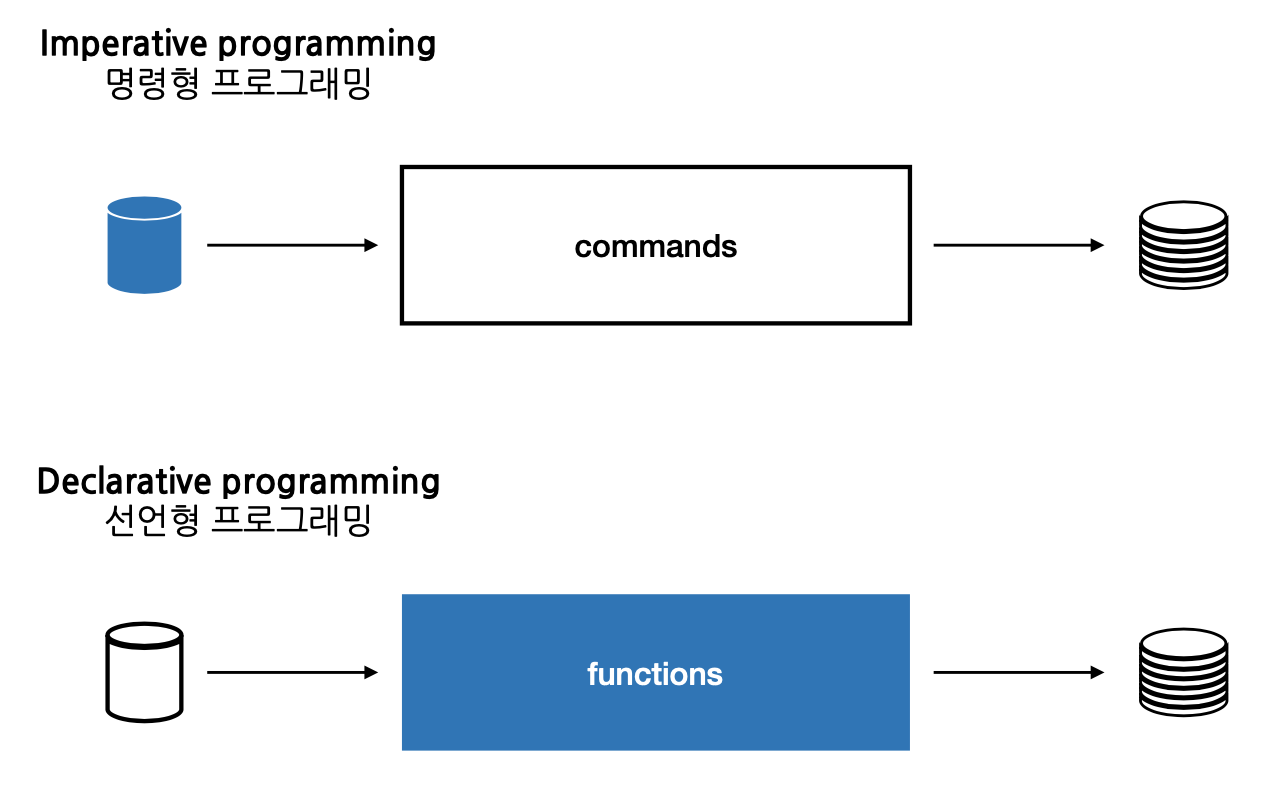
데이터를 정의하고 그것의 변화 과정을 프로그래밍 할 것이냐, 행위를 정의하고 거기에 데이터를 넣을 것이냐의 차이


  • 특별한 기술이 아니고 기존에 있던 방식으로 function 방식으로 프로그래밍을 하면 Functional Programming인 것.
  • 생각의 주체를 데이터에 두느냐 함수에 두드냐 생각의 관점이 옮겨짐 => 패러다임 


6) 'Functional' Summary

  • 데이터는 immutable하게 취급하자
  • 데이터 변경이 필요할 때는 새로 만들자
  • Side-Effect를 없애기 위해서 Pure function을 사용하자
  • Function들의 Composition과 High-Order Function으로 프로그램을 만들자
  • Data가 아닌 Process에 집중해서 프로그램을 만들자


4. Reactive

  • Async job, Expensive job : Callback or Delegate pattern으로 주로 사용
  • 배경: Async한 상황에서 async한 데이터를 어떻게 처리할 것이냐! 로 개념이 나오게 됨.
  • 결론: 스트림을 만들고 거기에 데이터를 흘려보내자,

Reactive 정의

In computing, reactive programming is an asynchronous programming paradigm concerned with data streams and the propagation of change.

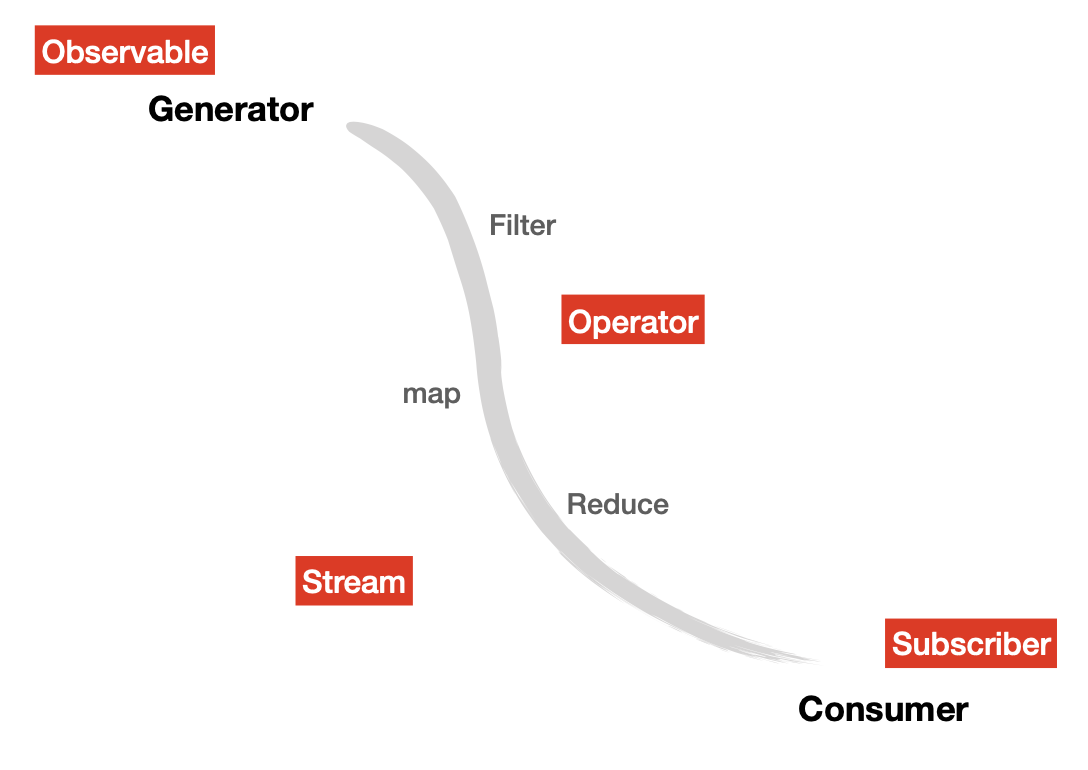
Observable은 데이터를 만드는 타입. 데이터가 흘러가는 사이에 Operator를 통해서 데이터를 변형 또는 조작이 이루어짐.
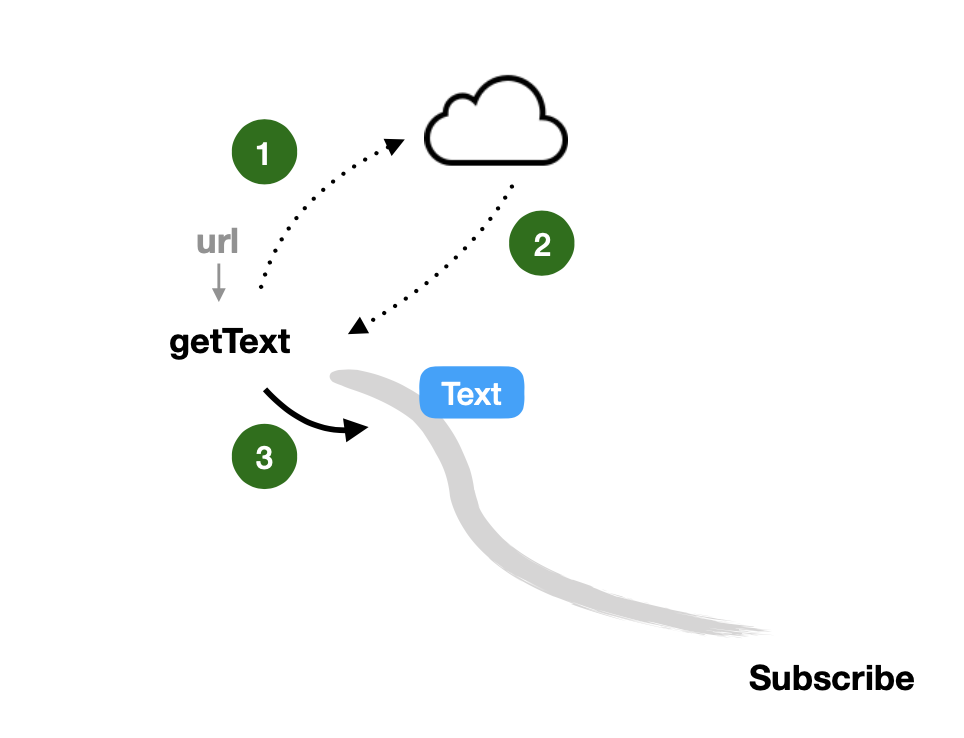
getText에 url을 넣으면 Stream을 리턴하는 것. 통신을 마치고 데이터를 스트림을 통해서 원하는 곳에 전달이 된다.

Reactive Summary

  • Async한 처리를 Functional하게 처리하자
  • 리턴값은 Stream인 Observable을 반환하자
  • Stream에 흐르는 Data/Event를 Operator로 처리하자
  • Stream과 Stream을 연결하자
  • Data가 아닌 Process에 집중해서 프로그램을 만들자


Ref.

https://iamchiwon.github.io/2017/11/04/frpp/


Functional Reactive Programming Paradigm

let us: Go! 2017 가을 세미나에서 발표한 내용

iamchiwon.github.io


예전에 커밋한 메시지를 수정하는 방법을 알아보자


1. 수정을 원하는 커밋이 존재하는 곳까지 HEAD로 부터 지정

git rebase -i HEAD~5


그러면 아래와 같이 편집을 할 수 있는데, 수정을 원하는 커밋에 pick 대신 edit(또는 e)를 써준다!
(커밋 메시지 수정 외의 다른 기능도 있음 - 아래 명령어 참조)

pick cc5605d test1
e 487bd6b test2
e 73bda22 test3
pick 0ce101f test4
pick a2198fc test5

# Rebase bb0d4f2..a2198fc onto bb0d4f2 (5 commands)
#
# Commands:
# p, pick <commit> = use commit
# r, reword <commit> = use commit, but edit the commit message
# e, edit <commit> = use commit, but stop for amending
# s, squash <commit> = use commit, but meld into previous commit
# f, fixup <commit> = like "squash", but discard this commit's log message
# x, exec <command> = run command (the rest of the line) using shell
# b, break = stop here (continue rebase later with 'git rebase --continue')
# d, drop <commit> = remove commit
# l, label <label> = label current HEAD with a name
# t, reset <label> = reset HEAD to a label
# m, merge [-C <commit> | -c <commit>] <label> [# <oneline>]
# .       create a merge commit using the original merge commit's
# .       message (or the oneline, if no original merge commit was
# .       specified). Use -c <commit> to reword the commit message.
#
# These lines can be re-ordered; they are executed from top to bottom.
#
# If you remove a line here THAT COMMIT WILL BE LOST.
#
# However, if you remove everything, the rebase will be aborted.
#
# Note that empty commits are commented out


2. 위 vi를 수정하고 저장하면 edit(또는 e)로 지정한 커밋 메시지로 차례차례 옮겨진다.

아래 명령어를 입력하여 현재 위치에 있는 메시지 수정

git commit -amend


수정이 완료가 되었으면 아래 명령어 입력. 아래 명령어를 입력하면 다음 수정하는 커밋으로 HEAD가 이동된다.

git rebase --continue


수정을 원하는 커밋이 모두 수정 완료되면

Successfully rebased and updated refs/heads/branch_name.


이렇게 나오면 정상적으로 수정 끝!


'Git' 카테고리의 다른 글

[Git] 정의 및 사용방법  (0) 2018.05.29
[Git] Remote branch 이름 변경하기  (1) 2016.04.06
[Git] .gitignore 적용 안될 경우 해결방법  (0) 2015.03.31

목차

  1. Subscript Syntax
  2. Subscript Usage
  3. Type Subscripts

Subscripts


Classes, structures, and enumerations can define subscripts, which are shortcuts for accessing the member elements of a collection, list, or sequence.  


(subscript - 컬렉션, 리스트, 시퀀스의 멤버 엘리먼트에 접근하기 위한 shortcut을 제공)

ex) someArray[index], someDictionary[key], ...


1. Subscript Syntax

- subscripts can be read-write or read-only.

subscript(index: Int) -> Int {
    get {
        // Return an appropriate subscript value here.
    }
    set(newValue) {
        // Perform a suitable setting action here.
    }
}


2. Subscript Usage

struct Matrix {
    let rows: Int, columns: Int
    var grid: [Double]
    init(rows: Int, columns: Int) {
        self.rows = rows
        self.columns = columns
        grid = Array(repeating: 0.0, count: rows * columns)
    }
    func indexIsValid(row: Int, column: Int) -> Bool {
        return row >= 0 && row < rows && column >= 0 && column < columns
    }
    subscript(row: Int, column: Int) -> Double {
        get {
            assert(indexIsValid(row: row, column: column), "Index out of range")
            return grid[(row * columns) + column]
        }
        set {
            assert(indexIsValid(row: row, column: column), "Index out of range")
            grid[(row * columns) + column] = newValue
        }
    }
}


3. Type Subscripts

enum Planet: Int {
    case mercury = 1, venus, earth, mars, jupiter, saturn, uranus, neptune
    static subscript(n: Int) -> Planet {
        return Planet(rawValue: n)!
    }
}
let mars = Planet[4]
print(mars)


Ref.

https://docs.swift.org/swift-book/LanguageGuide/Subscripts.html

https://kka7.tistory.com/118?category=919617

Methods

목차

  1. Instance Method
  2. Type Method

Class, Structure, Enumeration 모두 생성 가능


1. Instance Method

Modifying Value Types from Within Instance Methods

  • 기본적으로, Value 타입의 property는 인스턴스 메소드 안에서 수정될 수 없음.  (여기서말하는 value 타입은 struct, enum)
  • mutating 키워드 : 메소드에서 property의 수정이 가능하도록 정의하기 위해 추가
struct Point {
    var x = 0.0, y = 0.0
    mutating func moveBy(x deltaX: Double, y deltaY: Double) {
        x += deltaX
        y += deltaY
    }
}
var somePoint = Point(x: 1.0, y: 1.0)
somePoint.moveBy(x: 2.0, y: 3.0)
print("The point is now at (\(somePoint.x), \(somePoint.y))")
// Prints "The point is now at (3.0, 4.0)"


2. Type Method

  • 타입 자체에서 호출되는 메소드
  • func 키워드 앞에 static 키워드 작성
  • Objective-C에서는 Class에서만 type-level method를 정의할 수 있었다. Swift에서는 모든 클래스, 구조체, 열거형에서 정의 가능
class SomeClass {
    class func someTypeMethod() {
        // type method implementation goes here
    }
}
SomeClass.someTypeMethod()
struct LevelTracker {
    static var highestUnlockedLevel = 1
    var currentLevel = 1

    static func unlock(_ level: Int) {
        if level > highestUnlockedLevel { highestUnlockedLevel = level }
    }

    static func isUnlocked(_ level: Int) -> Bool {
        return level <= highestUnlockedLevel
    }

    @discardableResult
    mutating func advance(to level: Int) -> Bool {
        if LevelTracker.isUnlocked(level) {
            currentLevel = level
            return true
        } else {
            return false
        }
    }
}


Ref.

https://docs.swift.org/swift-book/LanguageGuide/Methods.html

https://kka7.tistory.com/117?category=919617

+ Recent posts