TheStringandStaticStringtypes conform to theExpressibleByStringLiteralprotocol. You can initialize a variable or constant of either of these types using a string literal of any length.
Conforming to ExpressibleByStringLiteral
To addExpressibleByStringLiteralconformance to your custom type, implement the required initializer.
Types that conform to theCustomStringConvertibleprotocol can provide their own representation to be used when converting an instance to a string. TheString(describing:)initializer is the preferred way to convert an instance ofanytype to a string. If the passed instance conforms toCustomStringConvertible, theString(describing:)initializer and theprint(_:)function use the instance’s customdescriptionproperty.
Accessing a type’sdescriptionproperty directly or usingCustomStringConvertibleas a generic constraint is discouraged.
Conforming to the CustomStringConvertible Protocol
AddCustomStringConvertibleconformance to your custom types by defining adescriptionproperty.
For example, this customPointstruct uses the default representation supplied by the standard library:
Example
enum CompassPoint {
    case north
    case south
	case custom(String)
}

extension CompassPoint: ExpressibleByStringLiteral {
	init(stringLiteral value: String) {
        switch value {
        case "north":
            self = .north
        case "south":
            self = .south
		default:
        	self = .custom(value)
		}
	}
}

extension CompassPoint: CustomStringConvertible {
	public var description: String {
        switch self {
        case .north:
	        return "north"
        case .south:
        	return "south"
        case .custom(let type):
            return type
        }
    }
}
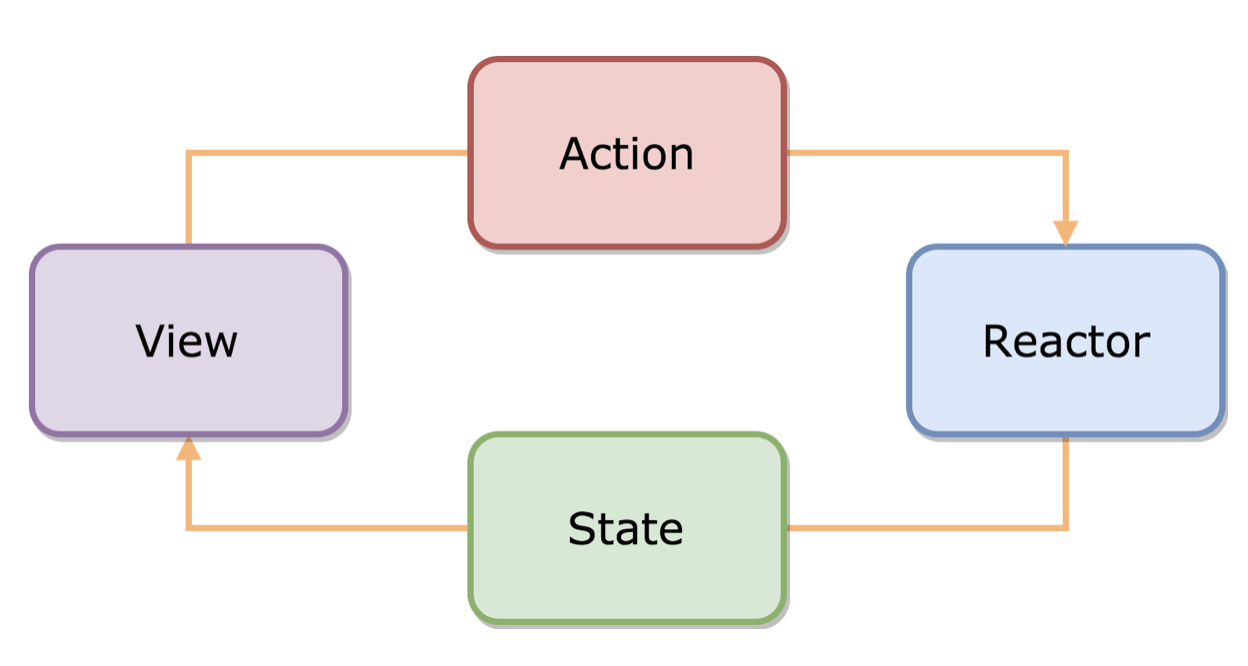
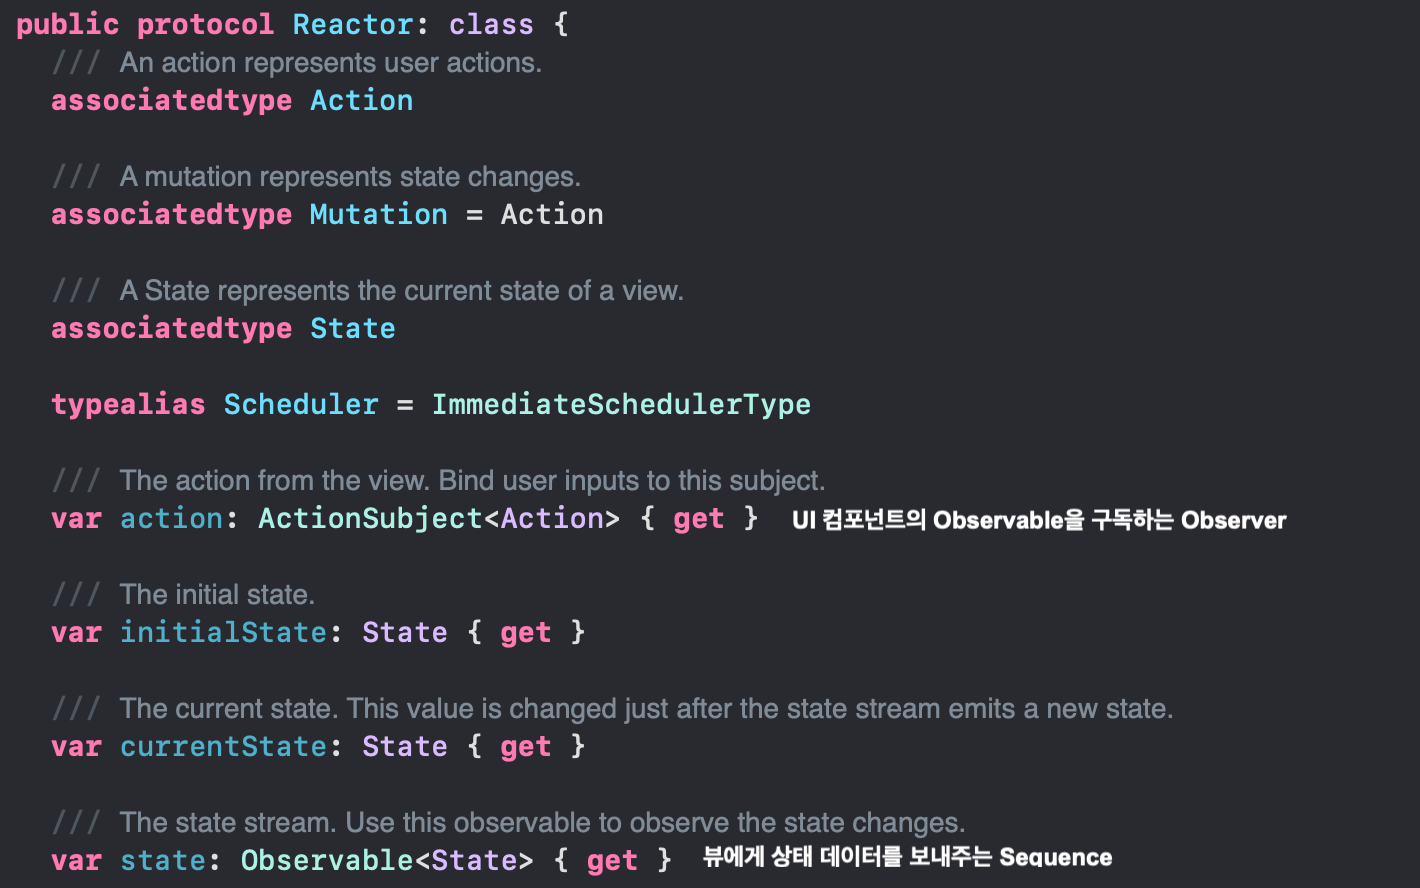
NOTE ReatorKit에서 말하는 액션 스트림과 상태 스트림은 아래 Reactor 클래스의 구현부를 보면 알 수 있다. 뷰에 있는 UI 컴포넌트에 rx를 이용하여 해당 Observable을 reactor의 action이 구독한다. 그리고, reactor.state인 Observable을 뷰의 UI 컴포넌트가 구독한다.
이와 같이 단방향으로 액션 스트림과 상태스트림으로 Action과 State 데이터가 이동한다.
3. Reactor = ViewModel
Reactor는 뷰의 상태를 관리하는 UI 독립적인 계층
Reactor의 가장 중요한 역할은 뷰로부터 제어 흐름을 분리하는 것
모든 뷰는 해당 Reacor를 가지고 있으며, 모든 로직을 그 Reactor에 위임한다.
Reactor는 뷰의 의존성이 없기 때문에 테스트하기가 용이하다.
리엑터를 정의하기 위해서는 Reactor 프로토콜을 준수하자!
세개 타입 Action, Mutation, State. + initialState 프로퍼티 필수!
Action은 사용자의 인터렉션, State는 뷰의 상태
class ProfileViewReactor: Reactor {
  // represent user actions (유저 액션을 나타냄)
  enum Action {
    case refreshFollowingStatus(Int)
    case follow(Int)
  }

  // represent state changes (상태 변화를 나타냄)
  enum Mutation {
    case setFollowing(Bool)
  }

  // represents the current view state (현재 뷰 상태를 나타냄)
  struct State {
    var isFollowing: Bool = false
  }

  let initialState: State = State()
}
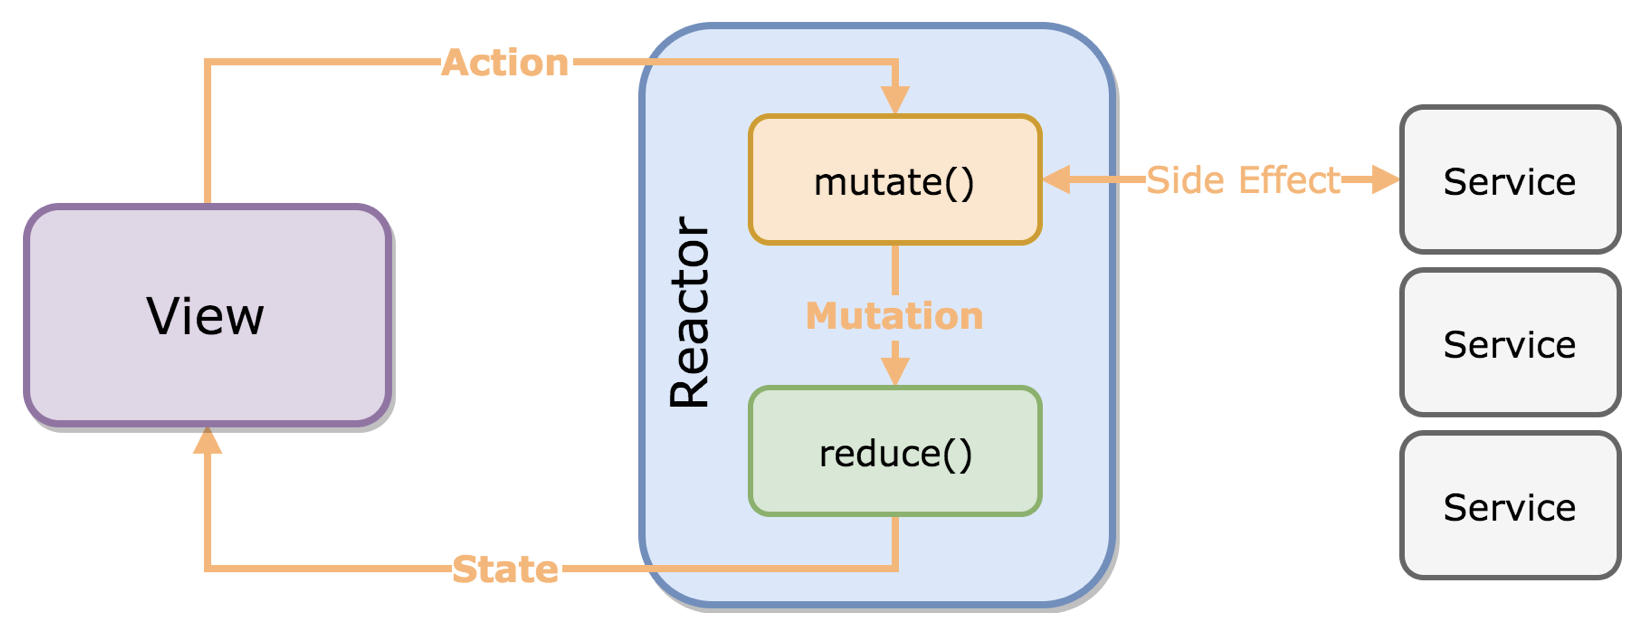
(중요)
리엑터는 2단계로 액션 스트림을 상태 스트림으로 변경한다:mutate()와reduce().
비동기 오퍼레이션 또는 API 호출과 같은 모든 사이드 이펙트는 이 메소드 안에서 수행된다
func mutate(action: Action) -> Observable<Mutation> {
  switch action {
  case let .refreshFollowingStatus(userID): // receive an action
    return UserAPI.isFollowing(userID) // create an API stream
      .map { (isFollowing: Bool) -> Mutation in
        return Mutation.setFollowing(isFollowing) // convert to Mutation stream
      }

  case let .follow(userID):
    return UserAPI.follow()
      .map { _ -> Mutation in
        return Mutation.setFollowing(true)
      }
  }
}
2) reduce()
기존 State과 Mutation으로부터 새로운 State를 생성
func reduce(state: State, mutation: Mutation) -> State
이 메소드는 순수함수(pure function)이므로 동기적으로 새로운 State를 리턴해야한다. 이 함수안에서 어떤 side effect들을 수행하지 말자.
func reduce(state: State, mutation: Mutation) -> State {
	var state = state 	// create a copy of the old state
    switch mutation {
    case let .setFollowing(isFollowing):
    	state.isFollowing = isFollowing // manipulate the state, create a new state
        return state	// return the new state
    }
}
Reactor의 일반적 Action → Mutation → State 흐름에 global state는 없으므로, global state 변경을 위해서 transform(muation:)을 사용해야 한다.
예) 현재 인증된 유저들을 저장하는 global BehaviorSubject가 있다고 가정. 만약 currentUser가 변경되었을 때 Mutation.setUser(User?)를 방출하기를 원한다면 아래와 같이 작성. 그리고 그 mutation은 뷰가 액션을 리엑터에게 보낼 때 각 시간에 방출될 것이다.
var currentUser: BehaviorSubject<User> // global state

func transform(mutation: Observable<Mutation>) -> Observable<Mutation> {
  return Observable.merge(mutation, currentUser.map(Mutation.setUser))
}
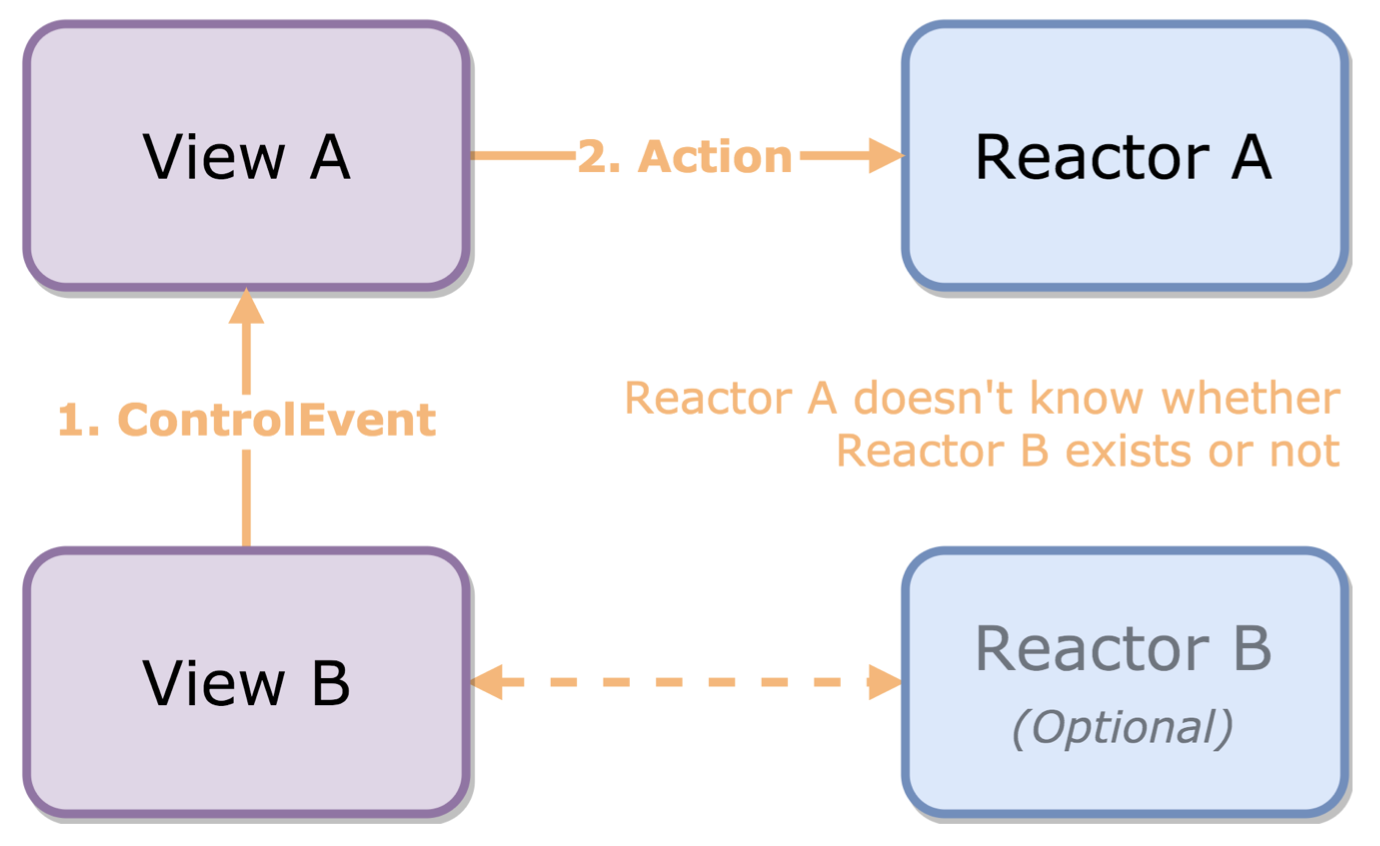
View Communication
ReactorKit은 global app state를 정의하고 있지 않으므로, global state를 관리하기 위해서 BehaviorSubject, PublishSubject, reactor를 사용할 수 있다.
여러개의 뷰들을 커뮤니케이션하기 위해서는 callback 클로저나 delegate 패턴을 사용하는 것이 일반적.
결론 iOS는 디바이스 크기 별로 할당되는 content area의 Size classes의 값을 토대로 다이나믹하게 layout 조정을 한다. - Size classes: 디바이스 별로 시스템이 두개로 정의함 (compact, regular)
Adaptivity and Layout
In iOS, interface elements and layouts can be configured to automatically change shape and size on different devices, during multitasking on iPad, in split view, when the screen is rotated, and more.
It’s essential that you design an adaptable interface that provides a great experience in any environment.
Auto Layout
Auto Layout is a development tool for constructing adaptive interfaces.
Using Auto Layout, you can define rules (known asconstraints) that govern the content in your app.
Auto Layout automatically readjusts layouts according to the specified constraints when certain environmental variations (known as traits) are detected.
Layout Guides and Safe Area
Layout guides define rectangular regions that don’t actually appear visibly onscreen, but aid with the positioning, alignment, and spacing of content. The system includes predefined layout guides that make it easy to apply standard margins around content and restrict the width of text for optimal readability. You can also define custom layout guides.
Size Classes
In iOS, Size Classes are groups of screen sizes that are applied to the width and height of the device screen.
The system defines two size classes. The two Size Classes that exist currently are Compact and Regular. - TheCompact Size Classrefers to a constrained space. It is denoted in Xcode as wC (Compact width) and hC (Compact height). - TheRegular Size Classrefers to a non-constrained space. It is denoted in Xcode as wR (Regular width) and hR (Regular height).
As with other environmental variations, iOS dynamically makes layout adjustments based on the size classes of a content area. (For example, when the vertical size class changes from compact height to regular height, perhaps because the user rotated the device from landscape to portrait orientation, tab bars may become taller.)
let numbers = [1, 2, 3, 4, 5]

for number in numbers {
	let formateedNumber = "\(number)$"
    formateedNumbers.apend(formattedNumber)
}

let mappedNumbers = numbers.map { "\($0)$" }
FlatMap
Array의 차원을 1레벨 flat 해줌.
flatten() 메소드와 같은 결과 => flatten() + map = FlatMap
3가지 경우일 때 사용 1. non-nil인 결과들을 가지는 배열을 리턴 2. 주어진 Sequence내의 요소들을 하나의 배열로써 리턴 3. 주어진 Optional이 not-nil인지 판단 후 unwrapping하여 closure 파라미터로 전달
세 패턴 모두 특정 이벤트가 일어나면 원하는 객체에 알려주어 해당되는 처리를 하는 방법을 가지고 있다.
하지만, 다른 객체와 종속되어 동작하는 것은 '재사용성'과 '독립된 기능 요소' 측면에서 바람직하지 않다.
그러므로, Delegateion, Notification, KVO를 사용한다.
Delegate vs. Notification vs. KVO 장단점 비교
Delegate
Notification
KVO
장점
매우 엄격한 Syntax로 인해 프로토콜에 필요한 메소드들이 명확하게 명시됨.
컴파일 시 경고나 에러가 떠서 프로토콜의 구현되지 않은 메소드를 알려줌.
로직의 흐름을 따라가기 쉬움.
프로토콜 메소드로 알려주는 것뿐만이 아니라 정보를 받을 수 있음.
커뮤니케이션 과정을 유지하고 모니터링하는 제 3의 객체(ex: NotificationCenter 같은 외부 객체)가 필요없음.
프로토콜이 컨트롤러의 범위 안에서 정의됨.
많은 줄의 코드가 필요없이 쉽게 구현이 가능.
다수의 객체들에게 동시에 이벤트의 발생을 알려줄 수 있음.
Notification과 관련된 정보를 Any? 타입의 object, [AnyHashable: Any]? 타입의 userInfo로 전달할 수 있음.
두 객체 사이의 정보를 맞춰주는 것이 쉬움.
new/old value를 쉽게 얻을 수 있음.
key path로 옵저빙하기 때문에 nested objects도 옵저빙이 가능함.
단점
많은 줄의 코드가 필요.
delegate 설정에 nil이 들어가지 않게 주의해야함. 크래시를 일으킬 수 있음.
많은 객체들에게 이벤트를 알려주는 것이 어렵고 비효율적임.(가능은 하지만)
key 값으로 Notification의 이름과 userInfo를 서로 맞추기 때문에 컴파일 시 구독이 잘 되고 있는지, 올바르게 userInfo의 value를 받아오는지 체크가 불가능함.
추적이 쉽지 않을 수 있음.
Notificaiton post 이후 정보를 받을 수 없음.
NSObject를 상속받는 객체에서만 사용이 가능함.
dealloc될 때 옵저버를 지워줘야 함.
많은 value를 감지할 때는 많은 조건문이 필요.
Delegate
Protocol로 정의 (java의 interface => 규약)
Delegate 역할을 하려는 객체는 이 Protocol을 따르며 원형만 있던 메소드들의 구현을 함
이렇게 세팅 후 이전 객체(SomeView)는 어떤 이벤트가 일어났을 시 delegate로 지정한 객체(SomeController)에 알려줄 수 있다. => 종속되어 동작하는 것이 아님. 독립적으로 떨어져 있음.
// 1) Delegate 프로토콜 선언
protocol SomeDelegate {
    func someFunction(someProperty: Int)
}

class SomeView: UIView {
    // 2) 순환 참조를 막기 위해 weak으로 delegate 프로퍼티를 가지고 있음
    weak var delegate: SomeDelegate?

    func someTapped(num: Int) {
        // 3) 이벤트가 일어날 시 delegate가 동작하게끔 함
        delegate?.someFunction(someProperty: num)
    }
}
// 4) Delegate 프로토콜을 따르도록 함
class SomeController: SomeDelegate {
    var view: SomeView?

    init() {
        view = SomeView()
        // 6) delegate를 자신으로 설정
        view?.delegate = self
        someFunction(someProperty: 0)
    }

    // 5) Delegate 프로토콜에 적힌 메소드 구현
    func someFunction(someProperty: Int) {
        print(someProperty)
    }
}

let someController = SomeController()
// prints 0
Notification
Notification Center라는 싱글턴 객체를 통해서 이벤트들의 발생 여부를 옵저버를 등록한 객체들에게 Notification을 post하는 방식으로 사용
// 1) Notification을 보내는 ViewController
class PostViewController: UIViewController {
    @IBOutlet var sendNotificationButton: UIButton!

    @IBAction func sendNotificationTapped(_ sender: UIButton) {
        guard let backgroundColor = view.backgroundColor else { return }

        // Notification에 object와 dictionary 형태의 userInfo를 같이 실어서 보낸다.
        NotificationCenter.default.post(name: Notification.Name("notification"), object: sendNotificationButton, userInfo: ["backgroundColor": backgroundColor])
    }
}

// 2) Notification을 받는 ViewController
class ViewController: UIViewController {

    override func viewDidLoad() {
        super.viewDidLoad()

        // 옵저버를 추가해 구독이 가능하게끔 함
        NotificationCenter.default.addObserver(self, selector: #selector(notificationReceived(notification:)), name: Notification.Name("notification"), object: nil)
    }

    // iOS 9 이상이 아닐 경우에는 removeObserver를 해줘야 함
    deinit {
        NotificationCetner.default.removeObserver(self)
    }

    @objc func notificationReceived(notification: Notification) {
        // Notification에 담겨진 object와 userInfo를 얻어 처리 가능
        guard let notificationObject = notification.object as? UIButton else { return }
        print(notificationObject.titleLabel?.text ?? "Text is Empty")

        guard let notificationUserInfo = notification.userInfo as? [String: UIColor],
            let postViewBackgroundColor = notificationUserInfo["backgroundColor"] else { return }
        print(postViewBackgroundColor)
    }
}
Key Value Observing
메소드나 다른 액션에서 나타나는 것이 아니라 프로퍼티의 상태에 반응하는 형태
(Swift 4 전까지는 NSObject의 메소드인observeValue(forKeyPath:change:context:)를 오버라이드하여 옵저버를 추가했으나 Swift4부터는 구독하고 싶은 프로퍼티에 observe()를 추가하여 클로저로 사용할 수 있게 하였다. 그러나 Swift 상에서는 didSet이나 willSet 같은 것으로 충분히 대체가 가능할 것 같아(동감) 굳이 써야하나 싶은 패턴인 것 같다.)
어떤 content(status bar, navigation bar, toolbar, tab bar, etc) 에도 덮이지 않는 뷰를 그리기 위해서 제공
iOS 11에서 해당 property deprecated => Safe Area 소개함. (iPhoneX 대응으로 인해 left, right 정보도 필요해짐)
UIView
In iOS 11 the UIViewControllertopLayoutGuideand thebottomLayoutGuideproperties have been replaced by the new safe area properties in UIView: => safeAreaInserts, safeAreaLayoutGuide
@available(iOS 11.0, *)
open var safeAreaInsets: UIEdgeInsets { get }
 // UIEdgeInserts - top, left, bottm, right : edge 크기

@available(iOS 11.0, *)
open var safeAreaLayoutGuide: UILayoutGuide { get }
// UILayoutGuide: A rectangular area that can interact with Auto Layout.
// bottomAnchor, heightAnchor, centerXAnchor, ...